Create IRCTC Account | Train Ticket Bookings | PNR Status
To Create IRCTC Account for Booking Train Tickets:
The Indian Railway Catering and Tourism Corporation (IRCTC) is the primary online platform for booking train tickets in India. If you’re planning to travel by train, creating an IRCTC account allows you to book tickets with ease, track your bookings, and access a variety of other travel services offered by Indian Railways. In this detailed guide, we’ll walk you through the process of create IRCTC account using your mobile phone. By the end of this article, you’ll have all the information you need to set up your account and start booking train tickets online.
Table of Contents
Step 1: Download the IRCTC Rail Connect App
To get started, you need to download the IRCTC Rail Connect App. This app is available on both Android and iOS devices, and it is the most convenient way to book train tickets and manage your bookings on the go. So, follow these steps to download the app and create irctc account:
- Open the Google Play Store or Apple App Store on your mobile phone.
- In the search bar, type “IRCTC Rail Connect” and tap Search.
- Locate the official app from IRCTC and tap on Install (for Android users) or Get (for iOS users).
- Wait for the app to download and install on your mobile device.
Once the app is installed, you’re ready to proceed with the account registration.
Step 2: Launch the IRCTC Rail Connect App
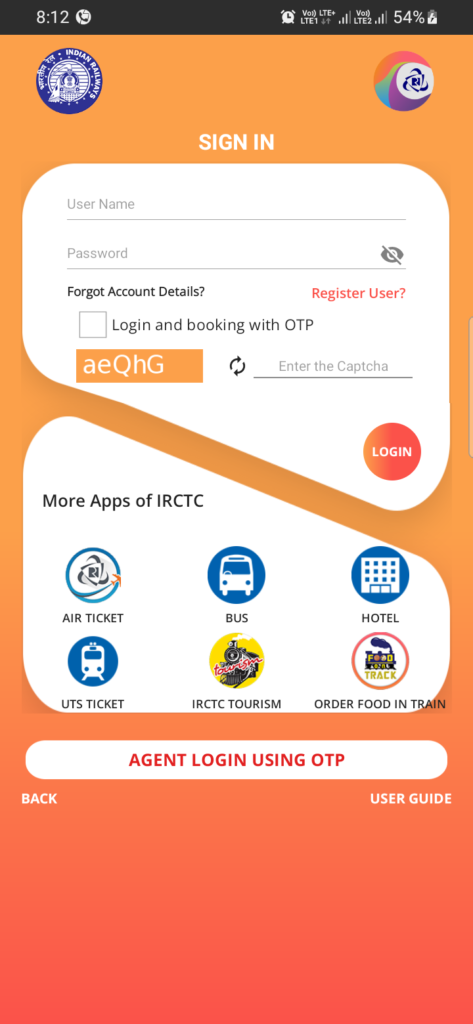
After successfully installing the app, open it by tapping on its icon on your home screen. Once you launch the app, you will see the SIGN IN and Register User options on the home screen. Since you’re creating a new account, tap on the Register User button.

This will take you to the registration page where you’ll need to enter your personal details to create your account.
Step 3: Provide Your Personal Information
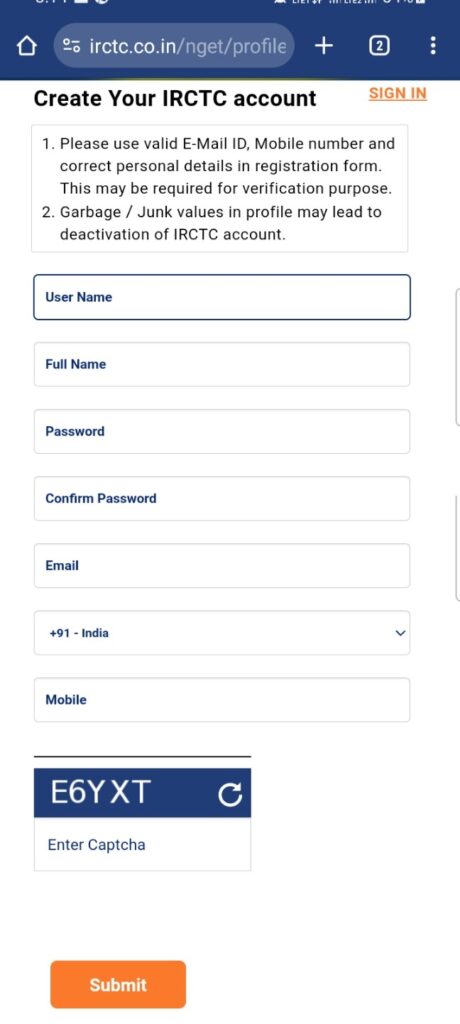
On the registration page, you will be asked to fill in your basic personal details. Here’s a breakdown of the fields you’ll need to complete to create irctc account:
- Username: Choose a unique username. This will be your login ID, so it should be something memorable but secure. Usernames must be between 3-10 characters and can include letters and numbers.
- Password: Create a secure password that includes a combination of uppercase and lowercase letters, numbers, and special characters. Your password should be at least 8 characters long.
- Security Question: Select a security question from the list provided. This is useful if you forget your password and need to recover your account. Choose a question with an answer you will easily remember.
- Full Name: Enter your first name, middle name (optional), and last name in the respective fields.
- Date of Birth: Tap on the date of birth field and use the drop-down calendar to select your birth date.
- Gender: Choose your gender from the options provided.
- Email Address: Enter your active email address. This is important for account verification and communication about your bookings.
- Mobile Number: Input your mobile number. Ensure the number is active because you will need it to verify your account.
- Nationality: Select your nationality from the drop-down menu.

Step 4: Enter Your Address Details
After entering your personal information, you will need to provide your residential address to create irctc account. The app requires this for verification purposes. Here’s what you’ll need to enter:
- Flat/House No.: Enter the number or name of your house or building.
- Street/Locality: Provide the name of the street or locality where you live.
- Pin Code: Enter the pin code for your area. This will automatically populate the city, district and state fields based on the pin code you’ve entered.
- City/Town: Ensure the correct city is displayed. If it isn’t, manually type the name of your city or town.
- State: Select the state where you reside from the drop-down list.
- Country: Your country (India, by default) will usually be auto-selected based on the previous information.
Once you’ve filled in all the details, review them carefully for accuracy.
Step 5: Verify Your Mobile Number and Email Address
The next crucial step is to verify your mobile number and email address. This is important for securing your account and ensuring that you receive important updates from IRCTC regarding your bookings.
- Mobile Number Verification: After submitting your details, IRCTC will send a One-Time Password (OTP) to the mobile number you provided. Enter the OTP in the designated field to verify your mobile number.
- Email Verification: IRCTC will also send a verification link to your email address. Go to your email inbox, open the email from IRCTC, and click on the verification link. This will confirm your email address.
Both your mobile number and email address must be verified before you can proceed further.
Step 6: Set Up Your Account Preferences
Once your mobile number and email address have been verified, the app will prompt you to set up your account preferences. These preferences will help customize your experience on the IRCTC platform. You’ll be asked to:
- Choose a Preferred Language: IRCTC offers services in multiple languages, including English and Hindi. Choose the language in which you’d like to use the app.
- Preferred Payment Mode: You can select a preferred payment mode for your bookings, such as credit card, debit card, UPI, net banking, or mobile wallets. This can be changed later, but choosing a preferred payment method now will streamline the booking process.
- Travel Preferences: If you often travel by train, you may set up preferences regarding the type of class you typically book (e.g., Sleeper Class, AC Chair Car) and the types of trains you prefer (e.g., Express, Shatabdi). While these are optional, they can save time when making future bookings.
Step 7: Complete the Registration Process
After setting your account preferences, review all the information you’ve entered one last time. Make sure that everything is correct, as incorrect details might cause issues later, especially when booking tickets or verifying your identity.
To create IRCTC account make sure that all the details are accurate, tap on the Submit button. IRCTC will process your information, and within a few moments, your account will be successfully created.
Step 8: Log in to Your IRCTC Account
Now that your account has been created, it’s time to log in and explore the app. Here’s how to log in:
- Open the IRCTC Rail Connect App.
- Tap on the Login option on the home screen.
- Enter your newly created username and password.
- Tap on Login to access your account.
After logging in, you’ll be able to view the home screen of the app, which features options like booking tickets, checking PNR status, viewing train schedules, and more.
Step 9: Booking Your First Train Ticket
With your account created, you’re now ready to book your first train ticket. Here’s a quick guide to booking tickets using your mobile:
- Tap on the ‘Book Ticket’ Option: On the home screen, tap on the ‘Book Ticket’ option to start.
- Enter Your Journey Details: Provide details of your journey, such as the departure and arrival stations, date of travel, and class of travel (Sleeper, 3AC, 2AC, etc.).
- Search for Trains: Tap on ‘Search’ to view the list of available trains for your selected route and date. You’ll also see the number of available seats in different classes.
- Select Your Train: Choose the train that best fits your schedule and class preference. You can also check train timings, stops, and other details.
- Passenger Details: Enter the names and details of the passengers traveling. Make sure the details match the ID proof you’ll carry during the journey.
- Choose Payment Option: Once you’ve filled in the passenger details, select your preferred payment option. You can use a credit card, debit card, UPI, net banking, or mobile wallets.
- Confirm Booking: Review the booking details, including the train name, class, and journey date. If everything looks correct, confirm your booking and proceed with the payment.
- Booking Confirmation: Once the payment is successful, you’ll receive a confirmation message along with your ticket details via email and SMS. You can also view the ticket in the app under the ‘My Bookings’ section.
Additional Features of the IRCTC Rail Connect App
After creating account and logged into your IRCTC account, you’ll have access to a variety of useful features, including:
- PNR Status Check: You can easily check the status of your booked tickets by entering the PNR number.
- Train Schedule and Availability: The app provides real-time information on train schedules and seat availability.
- Tatkal Booking: If you need to book a ticket at the last minute, the app allows you to book Tatkal tickets.
- Cancellations and Refunds: You can cancel tickets directly through the app and apply for refunds if applicable.
- Train Running Status: You can check the live running status of any train to track delays or changes in its schedule.
For more such contents follow Taza Content

Post Comment